
Appearance
Test Run Settings
When triggering a test run, you can configure several options per run. After selecting your Test Set, click the Test Settings button to open the settings panel:
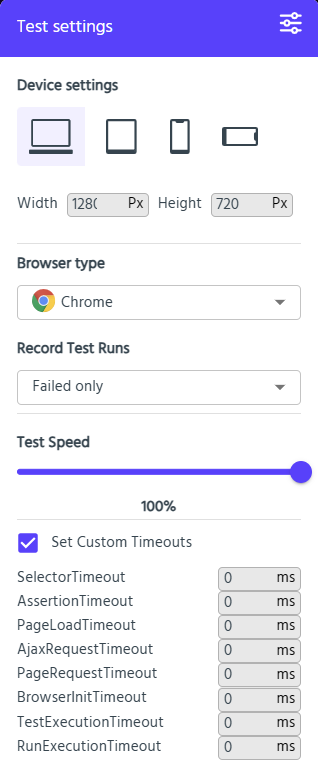
Device Settings
Specify the screen size for your tests. Choose from common presets (e.g., tablet, mobile) or enter a custom width and height.
Browser Type
Select which browser to run your tests against:
- Chrome
- Firefox
Record Test Runs
Choose when to record videos for your tests:
- Failed only – record videos for failed tests (useful for debugging)
- Never – do not record any videos
- Always – record videos for all tests
Test Speed
Adjust how quickly AireAssert executes actions:
- Slowing down can make videos easier to follow and help troubleshoot flaky tests.
Note: For even greater stability, consider adjusting Custom Timeouts (see below) rather than relying solely on reduced speed.
Custom Timeouts
AireAssert provides built-in timeouts for various actions. Defaults usually suffice, but you can override these to stabilise tests:
| Timeout | Description |
|---|---|
SelectorTimeout | Time to wait for a field to appear and become interactable. |
AssertionTimeout | Time to wait for an expected condition or value. |
PageLoadTimeout | Time to wait for a page to fully load. |
AjaxRequestTimeout | Time to wait for an AJAX request to complete. |
PageRequestTimeout | Time to wait for any page request to finish. |
BrowserInitTimeout | Time to wait for the browser to initialise before tests start. |
TestExecutionTimeout | Maximum duration allowed for an individual test. |
RunExecutionTimeout | Maximum duration allowed for the entire Test Set run. |